If you are in Patagonia you should spent as much time as possible out there in the nature. Therefore the Circuit Trail in Torres del Paine is the perfect Trekking option for experiencing the full awesomeness of the park including the southern ice field as the absolute highlight. Let me show you how to hike the circuit in Torres del Paine on your own including all information & costs needed!
Like in the other Guides for the shorter W trail I'll first explain the standard route and then give examples of longer & shorter itineraries afterwards. Please plan your trips always with regard to your physical ability and your experience. If you have no or just a bit of hiking experience keep it low and plan more time for each trek.
To prepare for trekking in Torres del Paine checkout my other post named ‘How to prepare for hiking in Torres del Paine' with information about transport, accommodation in Pto. Natales, Gear and prices.
Moreover I recommend a good health & travel insurance: the one I used from WorldNomads is perfect for this trekking trip as it covers also adventure activities!
Please Note: Since 2016 the CONAF limits the number of people on the circuit to 80 per day and you are only allowed to hike it counterclockwise. Make sure to reserve all campsites in advance and have some sort of confirmation with you to prove it (they only allow people with reservations to do the hike as the camp spots are limited). If you are too late and not able to make reservations your only chance is to take part in a guided trekking tour or explore the park with day hikes.
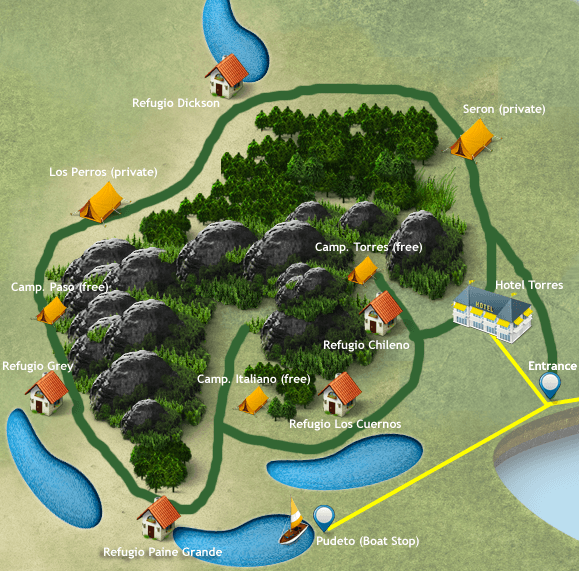
1) The circuit (a.k.a. ‘O') in 8 days, 7 nights
(130 km, around 137.800 CLP)
With the standard itinerary you will have the big experience of hiking Torres del Paine without being in a rush. Especially the first days are pretty relaxed and perfect to get used to the whole hiking thing.
Nevertheless I recommend to plan always 1 day more, because sometimes the John Gardner Pass is not doable due to very bad weather conditions – in that case you might have to go back and stay one night more at Campamento Los Perros (make sure to take some extra food with you).
Moreover I describe everything with stays in campsites / campsites next to Refugios (it's not possible to do the described trek with refugio stays only).
Day 1: Puerto Natales – Campamento Serón (12 km, 15.000 CLP + 21.000 CLP + 13.000 CLP)
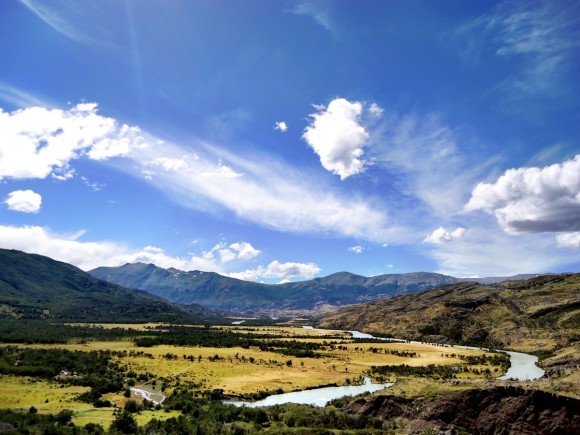
Leave Puerto Natales with the early bus (15.000 CLP return ticket) and get off at the park entrance (fee: 21.000 CLP) where you start walking. For this head to the river and cross it, walk along the street until you see a path to your right which goes to Serón.
After a nice walk through the woods and open grasslands you arrive at Campamento Serón in the early afternoon. We keep it low for today and start setting up the tent for the night (10.000 CLP).
Day 2: Campamento Serón – Refugio Dickson (18 km, 5.000 CLP)
Today you'll have to walk only a bit more than yesterday to get to the most beautiful campsite in the park. Because you'll walk approximately 5 hours you can get up late, pack your stuff and leave the camp after having a relaxed breakfast.
The path goes along a river and little lakes and heads uphill over a little pass where you are able to experience heavy winds.
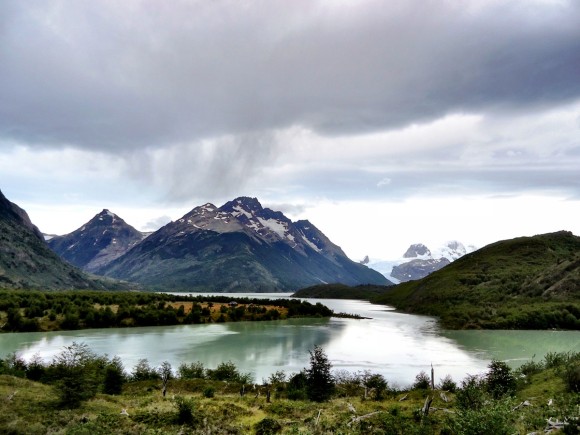
Depending on the time you left Serón you'll arrive in the afternoon at the lake Dickson where you find a campsite located directly on the river with a Glacier in the background.
Day 3: Refugio Dickson – Campamento Los Perros (11 km, 5.000 CLP)
Isn't it beautiful here? As you see you have another short, nice walk ahead – enough time to enjoy the scenery at Dickson for a bit longer, having a nice breakfast at the mirador before you get ready to hike.
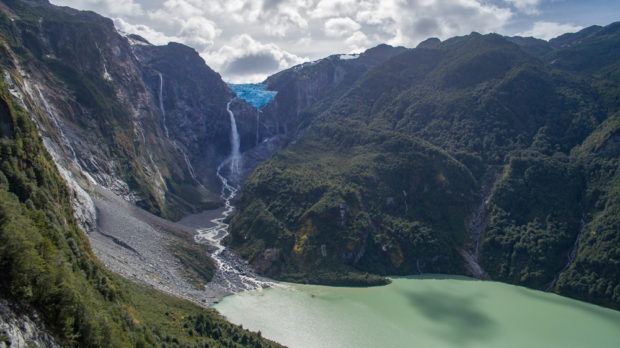
Start your hike to Los Perros at around 11 a.m. You'll hike a bit uphill and through the forrest before you reach a mirador with a nice view back to the Lago Dickson area and to the valley you are supposed to walk up. A bit later you have the chance of seeing a waterfall (you'll here when you are next to it).
Keep going after a short break. The path leads through a forrest and after that you'll cross the River twice. Now it goes up, across stones and rocks – believe me: it's worth it!
Up there you reach the Mirador Britanico with a great view to the Glacier Los Perros and the Glacier lake. Take your time as the campsite is only a 10-15min walk from here.
With all the breaks you'll reach Los Perros between 3 p.m. and 4 p.m.. Go to bed early today as the pass and with this the steepest part awaits you tomorrow. Set your alarm to 5 a.m. as it is best to cross the pass in the morning.
Day 4: Campamento Los Perros – Paso (12 km, free)
Oh, 5 a.m. – it's still dark and cold which makes you want to stay in your warm sleeping bag. Try to resist and head out to treat yourself with a nice breakfast and a hot coffee to be ready for the tough pass. After packing again -now you should be an expert in doing that- you leave the camp (6 a.m.) and head uphill for the next 2-3 hours.
After walking through the woods you'll reach an open area where you basically walk on stones and rocks. Before continuing make sure the weather conditions are good enough to see the orange/red poles that mark the trail. If not: turn around and head back as it might be to dangerous to continue (it get's much rougher the higher you get).
If everything is fine you will have an amazing walk, though it might be exhausting walking uphill and experiencing the strong winds. When you reach the highest point chances are high that you have to crouch due to strong winds – you can find a windcover on the left hand side to celebrate the climb. When continuing the wind will calm down but your breath will be taken away due to the stunning view you'll have for the next hour. Enjoy it and 5-6 hours after you left Los Perros you should arrive at Campamento Paso (11 a.m. – 12 a.m.) where you can enjoy some views nearby and have enough time to charge your batteries.
Day 5: Campamento Paso – Refugio Grey – Paine Grande (21 km, 6.000 CLP)
Wow – day number 5 and you already experienced a lot of cool stuff, eh? Stay excited and leave the Camp around 8 a.m.
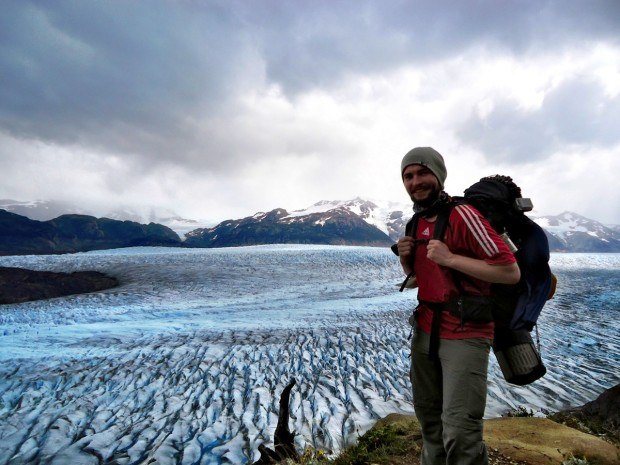
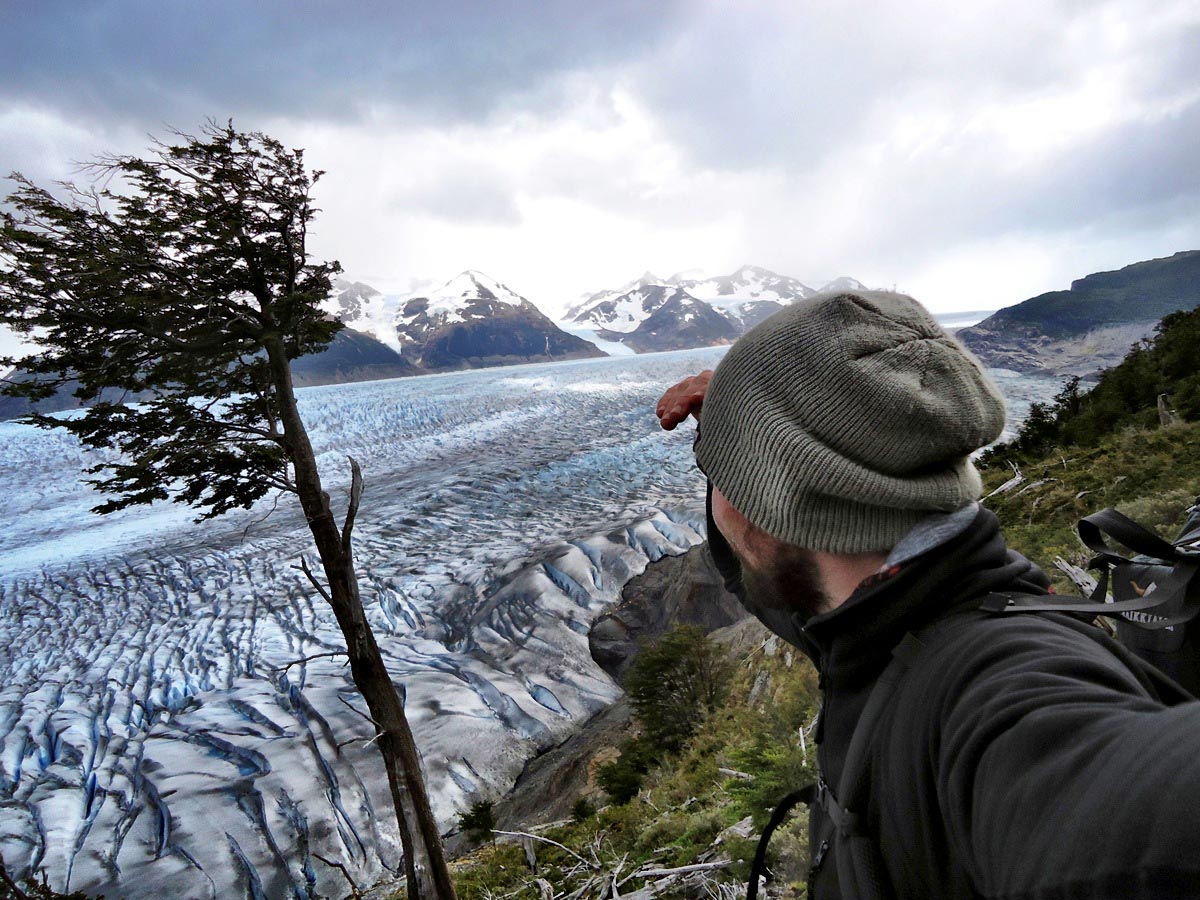
It took me 5 hours to walk to Refugio Grey and it was my personal highlight as you walk along the cliffs right next to the Glacier Grey. Moreover you have to climb some ladders and cross some bridges. 3-4 hours after you left Paso you arrive at an old campsite here you should use the chance to visit the Mirador nearby and continue afterwards to the Refugio Grey where you can have lunch (arrival around 1 p.m.).
Pack your stuff and head back down (at around 2 p.m.) to Paine Grande where you spent the night (6.000 CLP), it will take around 3-4 hours – make sure to find a nice place next to the little hill to avoid a bit of the massive winds down there.
Day 6: Valle del Frances – Los Cuernos (22,5 km, 70.000 CLP)
Today is a long & tough day, so get up early again and walk (start at 8:00 a.m.) to Campamento Italiano (around 2 hours = 10 a.m.), leave your big backpack at the camp and head to the Mirador Frances with your daypack (take lunch, water, suncream). After 2,5 hours you'll reach the Mirador and have lunch (12:30 pm.m.). Go back down to Italiano, grab your backpack and keep going to Los Cuernos (03:00 / 3:30 p.m.). After another 2 hours you should reach the campsite (at 5:00/5:30 p.m. – 70.000 CLP). Alternatively you can camp at the much cheaper Campamento Francés (10.000 CLP) and go for a longer trek on the following day.
Day 7: Los Cuernos – Campamento Torres (20 km, free but reservation mandatory)
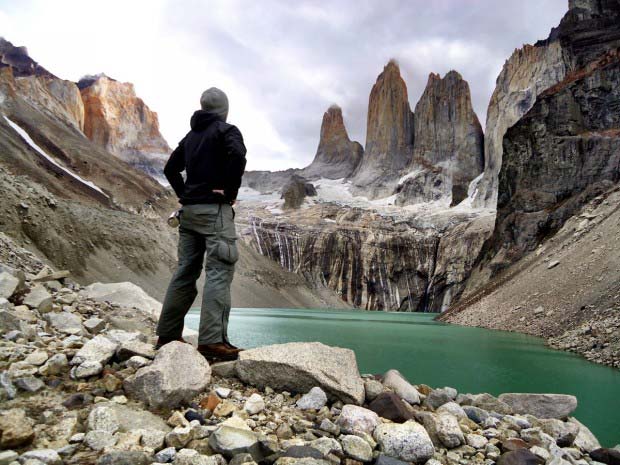
On your last full day you have a nice hike ahead – starting flat and going up at the end to the base of the Torres. Start your walk around 9 a.m. to Campamento Chileno. The trail goes along the Lago Nordernskjöld, after around 3,5 hours you'll reach the shortcut to Chileno (it's hard to miss as there is a big sign saying “shortcut to Chileno”). Another 2 hours later you'll arrive at the Refugio Chileno (around 2:30 p.m. / 3 p.m.) you can make a short break and afterwards head uphill to the free campsite Campamento Torres, this will take around 1 hour. After setting up your tent use the chance to visit the Torres for the first time – it's a 45 min walk uphill.
Note: Unfortunately Campamento Torres will be closed for the 2017-2018 season due to maintenance work – therefore you need to switch plans to camp at Chileno (pretty pricey) or down at Campamento Las Torres (next to Hotel Las Torres). You should consider doing the sunrise hike only if you stay at Chileno and calculate 2,5 – 3h to reach the towers.
Go to bed early today as you have to get up very early tomorrow to see the sunrise at the towers. Depending on the time of the sunrise (ask the rangers) set your alarm 1 – 1,5hours before and prepare a daypack with mat, sleeping bag and breakfast as well as rain jacket)
Day 8: Torres – Puerto Natales (10 – 15 km, 2.800 CLP optional)
In summer the sunrise is around 6 a.m., therefore leave the camp with your daypack at 5 a.m. to arrive at the Mirador of the Towers on time. Set up your little picnic and enjoy – if you are lucky you'll see amazing colors with a clear view, having the best breakfast ever. If you are not lucky like me you'll have rain and clouds – in that case you'll love the fact that you've been up here the day before. Don't make the fault to skip the way up when it is raining in the camp – the weather changes really quick and you might regret it later. Go for it anyway as it is your last day and it doesn't matter if your sleeping bag gets wet up there 😉
After your return take down your tent, pack your stuff and leave the camp at around 9 a.m. Head down to the Hotel Las Torres – it'll take around 3 hours to arrive there. Depending on the time you arrive (should be 12 p.m.) you can decide if you want to walk from the Hotel to the entrance (1 hour, 7,5km along the road) or pay 2.800 CLP extra to take the minibus which leaves around 2 p.m.
The Bus back to Puerto Natales leaves at 2:30 p.m. from the entrance as already described in the preparation Guide.
Congratulations! You've done the circuit / ‘O' and with that around 125-130 km by foot.
[divider]
2) The circuit in 7 days, 6 nights
(130 km, around 137.800 CLP)
Ok, you feel good, you made some hikes before or just have a limited time? Then you can also do the circuit in a day less. Please consider anyway to take food for an additional day as the pass might not be doable due to bad weather conditions.
Day 1: Puerto Natales – Campamento Serón (12 km, 15.000 CLP + 21.000 CLP + 13.000 CLP)
see standard itinerary
Day 2: Campamento Serón – Refugio Dickson – Los Perros (29 km, 5.000 CLP)
Today and tomorrow are quite challenging – so get a good breakfast and start early (7 a.m.) to get to the most beautiful campsite in the park around lunchtime.
The path goes along a river and little lakes and heads uphill over a little pass where you are able to experience heavy winds. You'll arrive at lunchtime at the lake Dickson where you find a campsite located directly on the river with a Glacier in the background (12 a.m.).
Isn't it beautiful here? As you see you have another 9 km walk ahead – enjoy the scenery at Dickson for a bit, having a nice lunch at the mirador before you get ready to hike (1 p.m.).
You'll hike a bit uphill and through the forrest before you reach a mirador with a nice view back to the Lago Dickson area and to the valley you are supposed to walk up. A bit later you have the chance of seeing a waterfall (you'll here when you are next to it).
The path leads through a forrest and after that you'll cross the River twice. Now it goes up, across stones and rocks – believe me: it's worth it!
Up there you reach the Mirador Britanico with a great view to the Galcier Los Perros and the Glacier lake. Take your time as the campsite is only a 10-15min walk from here.
With all the breaks you'll reach Los Perros between 6 – 7 p.m.. Go to bed early today as the pass and with this the steepest part awaits you tomorrow. Set your alarm to 5 a.m. as it is best to cross the pass in the morning.
Day 3: Campamento Los Perros – Paso – Refugio Grey (22 km, 5.000 CLP)
Oh, 5 a.m. – it's still dark and cold which makes you want to stay in your warm sleeping bag. Try to resist and head out to treat yourself with a nice breakfast and a hot coffee to be ready for the tough pass. After packing again -now you should be an expert in doing that- you leave the camp (6 a.m.) and head uphill for the next 2-3 hours.
After walking through the woods you'll reach an open area where you basically walk on stones and rocks. Before continuing make sure the weather conditions are good enough to see the orange/red poles that mark the trail. If not: turn around and head back as it might be to dangerous to continue (it get's much rougher the higher you get).
If everything is fine you will have an amazing walk, though it might be exhausting walking uphill and experiencing the strong winds. When you reach the highest point chances are high that you have to crouch due to strong winds – you can find a windcover on the left hand side to celebrate the climb. When continuing the wind will calm down but your breath will be taken away due to the stunning view you'll have for the next hour. Enjoy it and 5-6 hours after you left Los Perros you should arrive at Campamento Paso (11 a.m. – 12 a.m.) to charge your batteries before you continue to Grey.
It took me 5 hours to walk to Refugio Grey and it was my personal highlight as you walk along the cliffs right next to the Glacier Grey. Moreover you have to climb some ladders and cross some bridges. 3-4 hours after you left Paso you arrive at an old campsite: here you should use the chance to visit the Mirador nearby and continue afterwards to the Refugio Grey where you'll spend the night (arrival around 5 p.m., 5.000 CLP).
Day 4: Refugio Grey – Paine Grande (11 km, 6.000 CLP)
Yes, the last 2 days have been exhausting – we will use this day to relax a bit more to have enough power for the upcoming highlights. Therefore you can sleep longer and have a long breakfast.
Pack your stuff and head down (at around 11 a.m.) to Paine Grande where you spend the night (6.000 CLP), it will take around 3-4 hours – make sure to find a nice place next to the little hill to avoid a bit of the massive winds down there.
Continue with Day 6 of the standard itinerary
[divider]
3) The circuit in 9 days, 8 nights
(130 km, around 137.800 CLP)
Ok, you can't get enough and want to have a really relaxed trekking adventure – use this itinerary to enjoy it the best way.
For stretching your stay it's the best to split day number 6 and change the stops afterwards a bit. Therefore start with the standard itinerary and continue on Day 6 with this:
Day 6: Valle del Frances – Campamento Italiano (17,5 km, free but reservation needed)
You don't need to get up so early today (start at 10:00 a.m.) to Campamento Italiano (around 2 hours = 12 p.m.), leave your big backpack at the camp and head to the Mirador Frances with your daypack (take lunch, water, suncream). After 2,5 hours you'll reach the Mirador and have late lunch (14:30 pm.m.). Go back down to Italiano and get your tent ready for the night – as it is a free campsite you don't have to pay tonight.
Day 7: Campamento Italiano – Refugio Chileno (22 km, 70.000 CLP but reservation needed)
Again you can take it easy. Start your walk around 10 a.m. to Campamento Chileno. The trail goes along the Lago Nordernskjöld, after around 5,5 hours you’ll reach the shortcut to Chileno (it’s hard to miss as there is a big sign saying “shortcut to Chileno”). Another 2 hours later you’ll arrive at the Refugio Chileno (around 5:30 p.m.).
Day 8: Refugio Chileno – Campamento Torres (5 km, free but reservation needed)
As you see you have the most relaxed day ahead because you just move from one campsite to another. Have a slow start and head uphill, set up your tent and use the huge amount of time to spend some hours at the Torres in the afternoon.
Go to bed early today as you have to get up very early tomorrow to see the sunrise at the towers. Depending on the time of the sunrise (ask the rangers) set your alarm 1 – 1,5hours before and prepare a daypack with mat, sleeping bag and breakfast as well as a rain jacket.
Note: Unfortunately Campamento Torres will be closed for the 2017-2018 season due to maintenance work – therefore you need to switch plans to camp at Chileno (pretty pricey) or down at Campamento Las Torres (next to Hotel Las Torres). You should consider doing the sunrise hike only if you stay at Chileno and calculate 2,5 – 3h to reach the towers.
For Day 9 continue with Day 8 of the standard itinerary.
Consider: The free campsite Torres is very popular, therefore you can stay only for one night there.

[divider]
Come prepared!
I strongly recommend to get a good travel insurance as in almost every case your current health insurance won’t cover Chile. I used the travel insurance from WorldNomads which is perfect for this trekking trip as it covers a wide range of adventure activities including trekking up to 6,000m in the Standard Package. Use this tool to get a price for the exact time needed:
Download my Chile Guide incl. TdP itineraries
 Backpacking in Chile: my Chile Travel Guide
This is a clear and concise book based on my experience from 6 months traveling through Chile.
It includes travel guides for each region of Chile as well as a complete trekking guide for Torres del Paine, plus route itineraries. Checklists are included to help make sure you don’t forget anything.
This guide is designed to save you a lot of time & will make your trip much easier. Download it now or buy the paperback and take it with you!
Click here to learn more >>
[divider]
Videos
I produced 3 videos from my experience hiking the circuit – have a look to see what it's like:
During my time in Patagonia I hiked the W, the circuit and the Q. I hiked the “Q” in 2013 and did the circuit again in 2016, altogether I spent 3 weeks in the park. All times here are based on my experience (i hiked all the trails I'm writing about) – i would say I'm a bit faster in hiking than the average hikers but i made some stops in between for taking photographs and filming. The prices mentioned are for camping and per Person.
A good hiking map will be provided for free once you enter the park, you should consider getting a waterproof map beforehand for planning purposes.
This article is part of a whole series of free guides for Backpacking in South America.
[divider]
Have you ever been to Torres del Paine? Anything to add to the itineraries ‘How to hike the circuit in Torres del Paine'? Tell us more!
If you have any tips or hints feel free to join the conversation – post a comment below and share your experience!
Moreover you can share this article with your friends on Twitter, Facebook or Google Plus by using the related buttons on the left.